Canon imageRunner 5020i
NDPS Name: \\ae\canon1.elec.ae
Location: EM315
This printer / photocopier / scanner provides many features. A few of the more useful features are briefly described below:
Secured Printing ( )
)
One useful feature this unit has is called 'Secured Printing', which is similar to the 'Private Print' function on the Toshiba printer.
To use this feature:
- Decide whether you want to make this the default behaviour for this printer, or just modify the settings for the current application. Browse to the appropriate Printing Preferences menu as described under 'Printing from Windows'
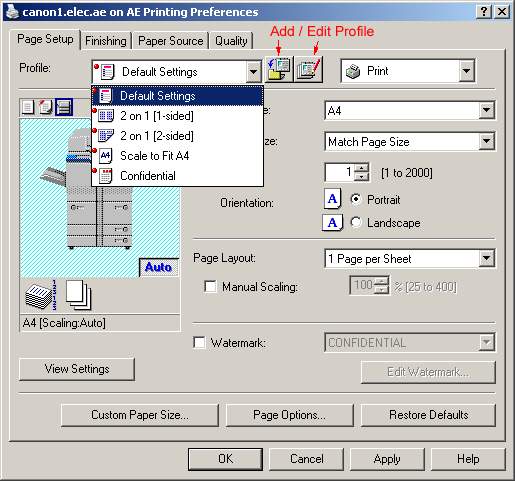
- In the first tab ('Page Setup'), at the end of the top row is a drop-down box populated with 'Print' (see screenshot at bottom of page). Click this box and select 'Secured Print'. Click 'OK' to the information popup box which appears.
- A 'Secured print settings' button will appear next to the drop-down box. Click on this and enter a username and password of your choice, then click OK, OK and 'Print' to print your document.
- At the printer, touch the 'System Monitor' button on the bottom-right corner of the touch-screen
- Touch the 'Print' button. Your job should be shown waiting in the list.
- Touch the 'Secured Print' button
- Enter the password you chose for the job and touch 'OK'. Your job will be printed.
Your job will be automatically deleted if it has not been released within three hours.
Printing Profiles ()
If you need to use different printer configurations for different document types, you can create a profile for each set of configurations. For example, you may like to print document drafts with a watermark of 'DRAFT', in draft quality and double-sided. On the other hand, you may prefer a page with a lot of graphics to be higher quality, and perhaps only single-sided. Rather than having to remember what setting to change every time, and which sub-menu it's stored in, you can simply create a print profile containing all those settings, and activate them at once just by selecting that profile.
To add or edit a profile:
- Click 'Start', 'Settings', 'Printers and Faxes' and right-click on \\ae\canon1.elec.ae. Select the 'Properties' option.
- Click the 'Printing Preferences' button
- The top row contains a list of profiles, as shown in the screenshot at the bottom of this list. It is pre-populated with a few common profiles, but you can edit these or add your own by using the two buttons directly to the right of the drop-down list.
- If you want to add a new profile, click the 'Add Profile' button and enter a name for your new profile. Choose an icon and enter a comment if you wish. Click 'OK' when done. Otherwise, move straight to the next step to edit the currently selected profile.
- Now work your way through the four tabs and choose the settings you wish to use for this profile. Click the 'OK' button when you're done.
- This profile and its associated settings will now be available in any application.